Install Autopsy 4.6 on Fedora Linux
Install Autopsy 4.6 on Fedora Linux
Quick Introduction to Autopsy
Anyone exploring what the opensource world has to offer in the realm of digital forensics will soon end up finding the Sleuthkit project. According to the Sleuthkit project website, the projects mission is to
"To create the leading open source file and volume system forensic analysis tools that run on all major platforms and allow access to common data types in methods that support standard analysis techniques. "
The Sleuthkit project is a series of command line tools used for working with and analyzing hard drive images. The folks behind the Sleuthkit project also created a tool called Autopsy, which is a GUI frontend for the Sleuthkit command line tools.
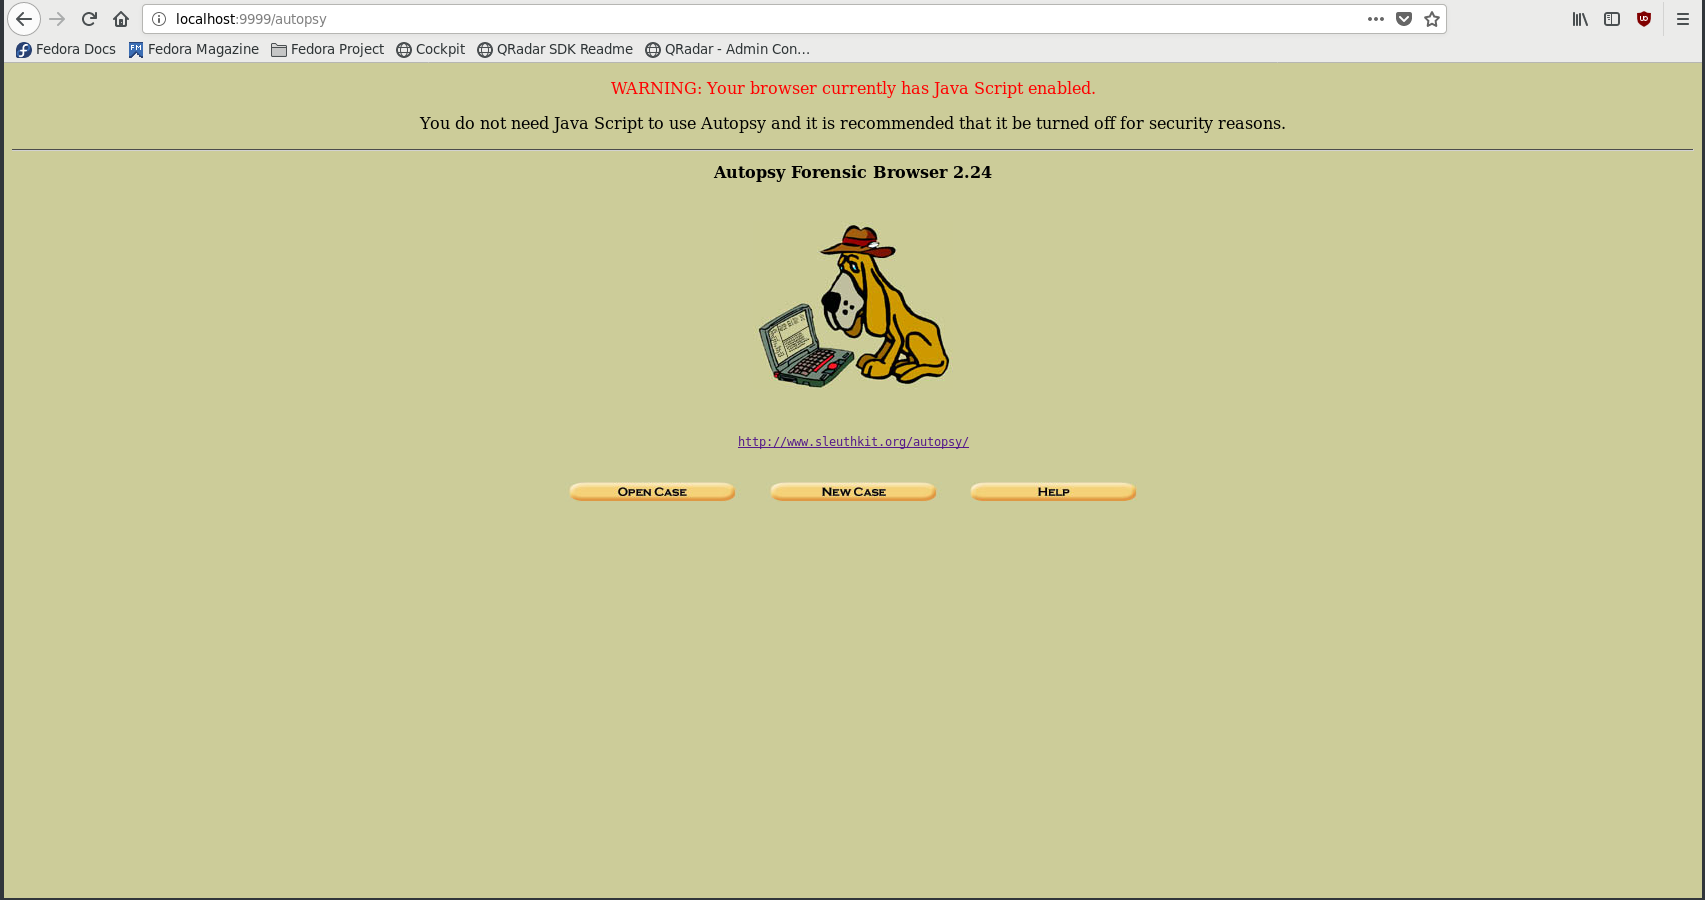
Up until version 2, Autopsy ran on Unix type operating systems natively and on Windows systems with the use of Cygwin. This version of Autopsy was HTML based. The Autopsy server ran locally and you would connect to it using a standard web browser.
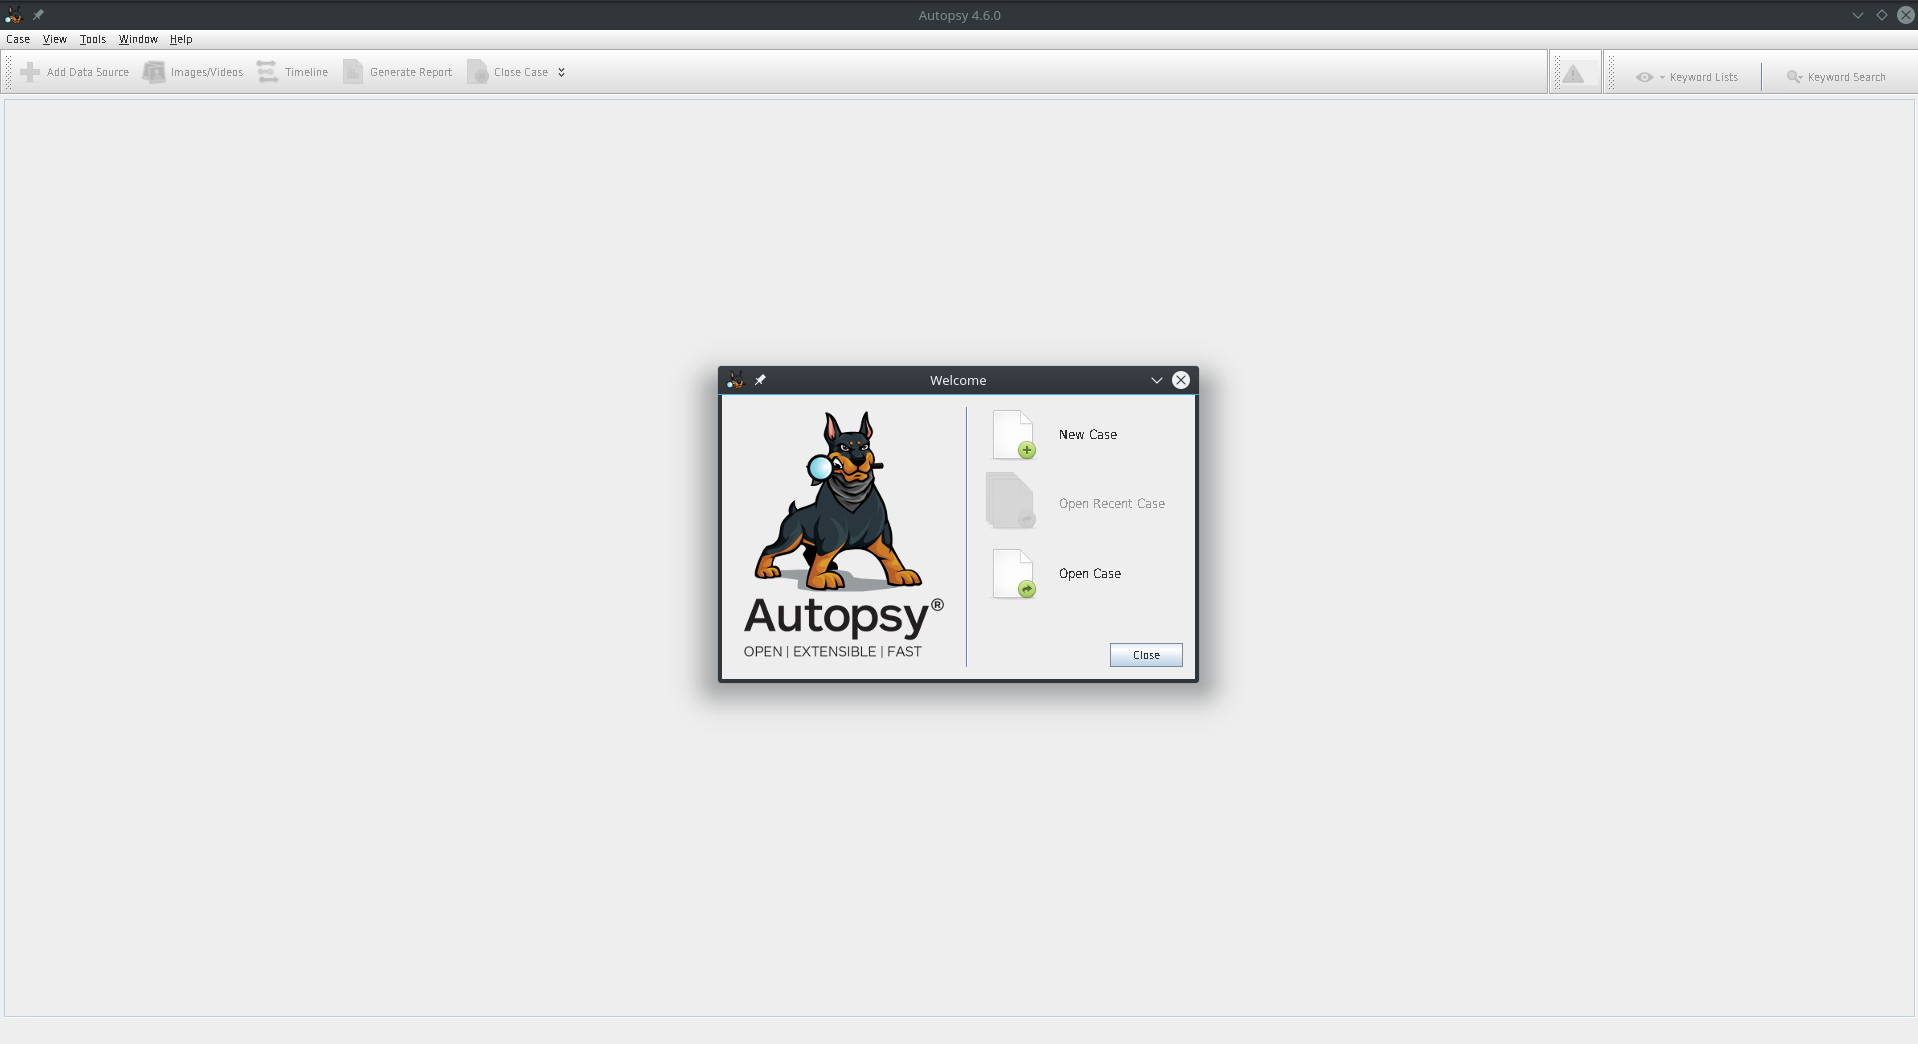
Starting with version 3, Autopsy went through a rewrite. The project was no longer HTML based. The project migrated to using the Java Swing GUI toolkit to build the user interface.
The second major change that occurred was that Autopsy 3 became Windows only. This was unfortunate for the forensic analysts out there for whom the OS of choice is Linux. This meant that all Infosec/Forensic Linux distributions no longer had a GUI for hard disk analysis. Analysts had to rely on using the command line versions of the Sleuthkit.
There’s good news! The Autopsy project recently released a version of Autopsy 4.6 that works on Linux. The packages and instructions are provided for Debian based operating systems. Since my workstation of choice is Fedora, I had to go through a couple of extra steps to get the software installed. In the next section I’ll be explaining those steps in detail.
Installation Pre-Requisites
Autopsy 4.6 requires the following prerequisites:
- photorec
- sleuthkit-java_4.6.0
- sleuthkit 4.6.0
- Oracle Java JRE
My workstation of choice is the Fedora Linux distribution. Why?….I like staying in the loop regarding what the Enterprise will be eventually using. Fedora being a cutting edge Redhat distribution means that what you see in Fedora today, will one day make its way into the RedHat Enterprise Linux distribution. Let’s begin with installing the prerequisites.
Installing photorec
To install the photorec we need to install the package called testdisk. I found this out by quering the software repositories using ‘dnf’ like so:
[root@localhost ~]# dnf whatprovides photorec

Last metadata expiration check: 2:08:36 ago on Mon 30 Apr 2018 01:36:50 PM EDT.
testdisk-7.0-11.fc27.x86_64 : Tool to check and undelete partition, PhotoRec recovers lost files
Repo        : @System
Matched from:
Filename    : /usr/bin/photorec

testdisk-7.0-11.fc27.x86_64 : Tool to check and undelete partition, PhotoRec recovers lost files
Repo        : fedora
Matched from:
Filename    : /usr/bin/photorec
Since testdisk provides us with photorec, we now install testdisk:
[root@localhost ~]# dnf install testdisk
Last metadata expiration check: 2:37:51 ago on Mon 30 Apr 2018 01:36:50 PM EDT.
Dependencies resolved.
=============================================================================================================================
 Package                      Arch                       Version                            Repository                  Size
=============================================================================================================================
Installing:
 testdisk                     x86_64                     7.0-11.fc27                        fedora                     439 k

Transaction Summary
=============================================================================================================================
Install  1 Package

Total download size: 439 k
Installed size: 1.5 M
Is this ok [y/N]:
Installing SleuthKit
The sleuthkit package does not come in the default Fedora software repositories. My preferred method for installing sleuthkit is from the CERT Forensics Tools software repository. You can find details and downloads on the CERT website https://forensics.cert.org/. To configure our Fedora workstation to use the CERT repository we perform the following steps:
1 - Download the RPM for your version of Fedora/Centos/RHEL from the https://forensics.cert.org/ website. For this instance we download the RPM for Fedora 27: https://forensics.cert.org/cert-forensics-tools-release-27.rpm
2 - Once we have the RPM downloaded, we install it locally:
[root@localhost Downloads]# dnf install cert-forensics-tools-release-27.rpm
Last metadata expiration check: 2:48:04 ago on Mon 30 Apr 2018 01:36:50 PM EDT.
Dependencies resolved.
=============================================================================================================================
 Package                                     Arch                  Version                 Repository                   Size
=============================================================================================================================
Downgrading:
 cert-forensics-tools-release                noarch                27-12                   @commandline                 16 k

Transaction Summary
=============================================================================================================================
Downgrade  1 Package

Total size: 16 k
Is this ok [y/N]:
3 - Once the repository is installed and activated we can install sleuthkit
[root@localhost Downloads]# dnf install sleuthkit
Last metadata expiration check: 3:22:18 ago on Mon 30 Apr 2018 01:36:50 PM EDT.
Dependencies resolved.
=============================================================================================================================
 Package                              Arch                  Version                           Repository                Size
=============================================================================================================================
Installing:
 sleuthkit                            x86_64                4.6.0-3.fc27                      forensics                1.5 M
Installing dependencies:
 afflib                               x86_64                3.7.16-4.fc27                     updates                  210 k
 java-openjdk                         x86_64                1:10.0.1.10-1.fc27                updates                  215 k
 java-openjdk-headless                x86_64                1:10.0.1.10-1.fc27                updates                   41 M
 mac-robber                           x86_64                1.02-13.fc27                      fedora                    22 k
 sleuthkit-libs                       x86_64                4.6.0-3.fc27                      forensics                1.2 M
 ttmkfdir                             x86_64                3.0.9-51.fc27                     fedora                    55 k
 xorg-x11-fonts-Type1                 noarch                7.5-18.fc27                       fedora                   521 k

Transaction Summary
=============================================================================================================================
Install  8 Packages

Total download size: 44 M
Installed size: 189 M
Is this ok [y/N]:
Install Oracle Java JRE
Autopsy is written in Java and therefore requires a java runtime environment. You may already have a JRE installed on your workstation as it is a dependency of sleuthkit. Fedora repositories have the OpenJDK java runtime available and this is the version that would’ve been installed if you already installed sleuthkit using dnf. Unfortunately Autopsy is not compatible with this version. Autopsy relies on some features found specifically in the Oracle Java JRE so we’ll need to install that one. Conveniently, Oracle provides RPM’s for Java on the java.com website. Download the RPM for your specific OS here: https://java.com/en/download/linux_manual.jsp
Once we have the Java RPM downloaded, we use dnf to install it.
[root@localhost Downloads]# dnf install jre-8u161-linux-x64.rpm
Last metadata expiration check: 3:21:24 ago on Mon 30 Apr 2018 01:36:50 PM EDT.
Dependencies resolved.
=============================================================================================================================
 Package                   Arch                      Version                           Repository                       Size
=============================================================================================================================
Installing:
 jre1.8                    x86_64                    1.8.0_161-fcs                     @commandline                     60 M

Transaction Summary
=============================================================================================================================
Install  1 Package

Total size: 60 M
Installed size: 141 M
Is this ok [y/N]:
So we now have the Oracle Java JRE installed. Let’s make sure it installed correctly
[root@localhost Downloads]# which java
/usr/bin/java
Java exists. Is it the correct version?
[root@localhost Downloads]# java -version
openjdk version "1.8.0_171"
OpenJDK Runtime Environment (build 1.8.0_171-b10)
OpenJDK 64-Bit Server VM (build 25.171-b10, mixed mode)
Uhoh…..It’s the OpenJDK version. What happened to our Oracle JRE installation? Turns out it’s possible to have more than one JRE installed. However, only one can be the default java. To configure which java is the default java used by the system, we use the ‘alternatives’ utility.
[root@localhost Downloads]# alternatives --config java

There are 3 programs which provide 'java'.

  Selection    Command
-----------------------------------------------
*+ 1           java-1.8.0-openjdk.x86_64 (/usr/lib/jvm/java-1.8.0-openjdk-1.8.0.171-1.b10.fc27.x86_64/jre/bin/java)
   2           java-openjdk.x86_64 (/usr/lib/jvm/java-10-openjdk-10.0.1.10-1.fc27.x86_64/bin/java)
   3           /usr/java/jre1.8.0_161/bin/java

Enter to keep the current selection[+], or type selection number: 3
If you select option 3, you’ll make the Oracle JRE the new java default. We can now test if that’s the case
[root@localhost Downloads]# java -version
java version "1.8.0_161"
Java(TM) SE Runtime Environment (build 1.8.0_161-b12)
Java HotSpot(TM) 64-Bit Server VM (build 25.161-b12, mixed mode)
We’re now using the Oracle Java JRE instead of OpenJDK. One last Java step is setting the $JAVA_HOME variable. We add the following line to the /etc/environment file
JAVA_HOME="/usr/bin/"Perfect. That takes care of installing java.
Installing Sleuthkit-Java
The Autopsy project provides us with the sleuthkit-java prerequisite in the form of a .deb file
- sleuthkit-java_4.6.0-1_amd64.deb
The sleuthkit-java_4.6.0-1_amd64.deb file is a Debian .deb package that is used to install Sleuthkit-Java on Debian and Ubuntu based Linux distributions. This is great for any Linux distributions based on Debian or Ubuntu, such as the SANS SIFT workstation. Since we’re installing this on Fedora we can’t install the package directly from the .deb file.
We first extract the files that we need from the .deb file. For this we use a tool called ‘dpkg-deb’, which is a Debian package archive manipulation tool.
[root@localhost ~]# dpkg-deb -x sleuthkit-java_4.6.0-1_amd64.deb /temp/sleuthkit_java/This command extracts the content of the .deb package. The file we’re interested in, sleuthkit-4.6.0.jar, is located in usr/share/java.
[root@localhost /tmp/sleuthkit_java]# ls -R usr/
usr/:
lib  share

usr/lib:
x86_64-linux-gnu

usr/lib/x86_64-linux-gnu:
libtsk.a  libtsk_jni.a  libtsk_jni.la  libtsk_jni.so  libtsk_jni.so.0  libtsk_jni.so.0.0.0  libtsk.la  libtsk.so  libtsk.so.13  libtsk.so.13.4.1

usr/share:
doc  java

usr/share/doc:
sleuthkit-java

usr/share/doc/sleuthkit-java:
changelog.Debian.gz  copyright

usr/share/java:
sleuthkit-4.6.0.jar  sqlite-jdbc-3.8.11.jar
The files located in usr/share/java are the files that the sleuthkit-java_4.6.0-1_amd64.deb package would install on a Debian system. We’ll need to install those ourselves.
The sqlite-jdbc-3.8.11.jar file can easily be installed using the Fedora package manager as it is available in the default software repositories.
[root@localhost ~]# dnf install sqlite-jdbc
Last metadata expiration check: 2:29:51 ago on Sun 27 May 2018 07:25:04 AM EDT.
Dependencies resolved.
=====================================================================================================================================================================================
 Package                                        Arch                                      Version                                            Repository                          Size
=====================================================================================================================================================================================
Installing:
 sqlite-jdbc                                    x86_64                                    3.15.1-5.fc27                                      fedora                             194 k

Transaction Summary
=====================================================================================================================================================================================
Install  1 Package

Total download size: 194 k
Installed size: 232 k
Is this ok [y/N]:
The sleuthkit-4.6.0.jar file doesn’t exist in the Fedora repositories so we’ll need to install it manually ourselves. We need to find out where Autopsy expects the file and copy the file to that location manually. The Autopsy ZIP comes with a script called ‘unix_setup.sh’. The script does a handful of checks to see if all prerequisites are present. The check that we’re interested in right now is for the existance of sleuthkit-4.6.0.jar.
# Verify Sleuth Kit Java was installed
sleuthkit_jar_filepath=/usr/share/java/sleuthkit-$TSK_VERSION.jar;
The ‘unix_setup.sh’ script expects to find sleuthkit-4.6.0.jar to be in /usr/share/java/. We simply copy the file to the expected location.
[root@localhost /tmp/sleuthkit_java]# cp usr/share/java/sleuthkit-4.6.0.jar /usr/share/java/Configuring and Running Autopsy
Normally we should now be able to install/configure Autopsy by executing the unix_setup.sh script. Unfortunately the way we have our $JAVA_HOME configured, the default unix_setup.sh script won’t work. We need to modify the check for java. The current line reads this:
# Verify Java was installed and configured
if [ -n "$JAVA_HOME" ];  then
        if [ -x "$JAVA_HOME/bin/java" ]; then
The ‘/bin’ in the path results in an error with the check. Based on how we set our $JAVA_HOME environment variable in a previous step, this check looks for a path/file that doesn’t exist. Here is what $JAVA_HOME/bin/java actually resolves to:
[user@localhost ~]$ echo $JAVA_HOME/bin/java
/usr/bin//bin/java
This path doesn’t exist. We need to modify the unix_setup.sh script to read as follows:
# Verify Java was installed and configured
if [ -n "$JAVA_HOME" ];  then
        if [ -x "$JAVA_HOME/java" ]; then
This line now resolves correctly:
[user@localhost ~]$  echo $JAVA_HOME/java
/usr/bin//java
We can now run the unix_setup.sh script to configure/install Autopsy.
[user@localhost autopsy4.6]$ ./unix_setup.sh
/usr/bin/photorec found
Java found in /usr/bin/
/usr/share/java/sleuthkit-4.6.0.jar found
Copying into the Autopsy directory
Autopsy is now configured. You can execute bin/autopsy to start it
Run it to test the installation.
[user@localhost autopsy4.6]$ bin/autopsy
Awesome! You’re now ready to analyze evidence using Autopsy on your Feodra workstation. In future posts I’m hoping to go over how to analyze some evidence using your newly installed tool.
Stay tuned!